Azure
This section covers deploying Live Transcoder on Microsoft Azure virtual machines.
Launch host instance
We provide Live Transcoder as a Docker container downloadable from DockerHub. Therefore you need to have a host instance to run the Docker container on.
Live Transcoder needs an Nvidia GPU to work, so you need to use an instance with Nvidia GPU. We recommend using NCasT4_v3 instances with Nvidia Tesla T4 GPUs as they provide a good price/performance ratio.
Select the region
We recommend selecting the region closest to you for the lowest latency. However, GPU instance prices vary between regions, so you may check other regions as well.
Select the right instance size
- We recommend you start with
Standard_NC8as_T4_v3(eight vCPUs, single Nvidia Tesla T4) instance size and change the instance type if needed. - Generally, you'll need two vCPUs per 1080p h264 4:2:0 8bit stream and sixteen vCPUs per 1080p h264 4:2:2 10bit stream, but this may vary with the resolution/quality/codec used.
- We strongly recommend you increase the instance size (vCPUs) if the overall CPU utilization exceeds 75%.
- Our support can help you choose the right instance size.
Create the instance
Head to Virtual machines > Create > Virtual Machine
Instance settings
Basics
Project Details
- Subscription: Select your active Azure subscription.
- Resource group: Select an existing resource group or create a new one.
- Virtual machine name: Enter a descriptive VM name.
- Region: Choose the target region where the VM will run.
- Availability options: Select "No infrastructure redundancy required".
- Security type: Select "Standard".
- Image: Select "Ubuntu Server 24.04 LTS - x64 Gen2".
- VM architecture: Select "x64".
- Size: Select "Standard_NC8as_T4_v3".
Administrator account:
Under Authentication type, select "SSH public key". If you do not already have an SSH key pair, generate a new one in the portal and give it a distinctive, meaningful name so you can identify it later.
Inbound port rules
Enable inbound port rules for SSH (TCP/22), HTTP (TCP/80), and HTTPS (TCP/443) to allow secure remote access and web traffic to the virtual machine.
Disks
Increase the OS disk size to 128 GiB (P10) and enable the Delete with VM option.
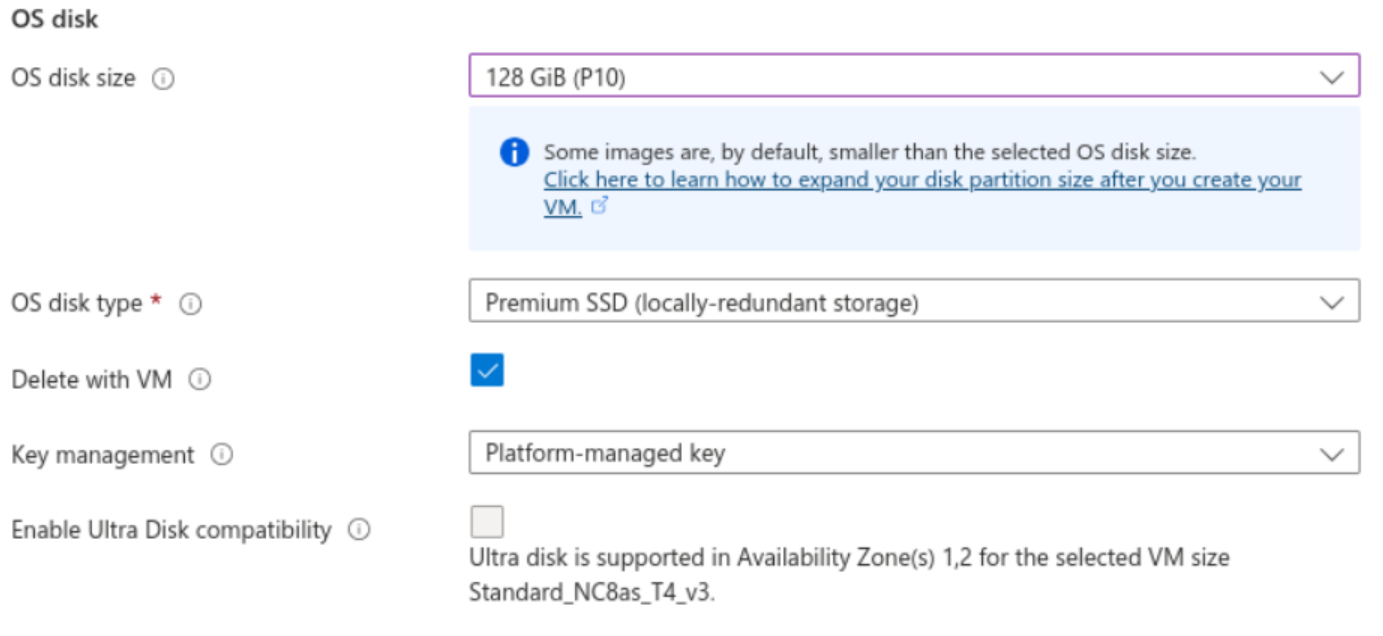
Live Transcoder itself needs 100GiB of the storage.
If you plan to use HLS outputs, increase the value by additional calculated storage.
When using an instance with a smaller storage capacity, it is important to note that a significant portion of the free space is used for storing log messages in the journal. These log messages are crucial for diagnostics. Insufficient space for the journal can limit the ability to diagnose issues with the instance effectively.
To manage disk space efficiently, ensure you set the correct size for SystemKeepFree= and RuntimeKeepFree= in /etc/systemd/journald.conf.
Networking
Under the Networking section, select or create a new Virtual network, then create a Public IP address using the Standard SKU with Static assignment and the Microsoft network routing preference. For the NIC network security group, choose Basic and ensure that the allowed inbound ports match those configured in the Basics section. Finally, enable the Delete public IP and NIC when VM is deleted option.
Management, Monitoring, Advanced and Tags
Under these sections, you can leave all settings at their default values.
Once you complete the setup, review all your configuration details in the Review + create section, then click Create to deploy the virtual machine. The deployment process should take only a few minutes to complete.
Once the VM is created, you will be prompted to download and save your SSH private key. Make sure to store it securely, as it will be required to connect to the virtual machine via SSH.
Additional inbound port rules
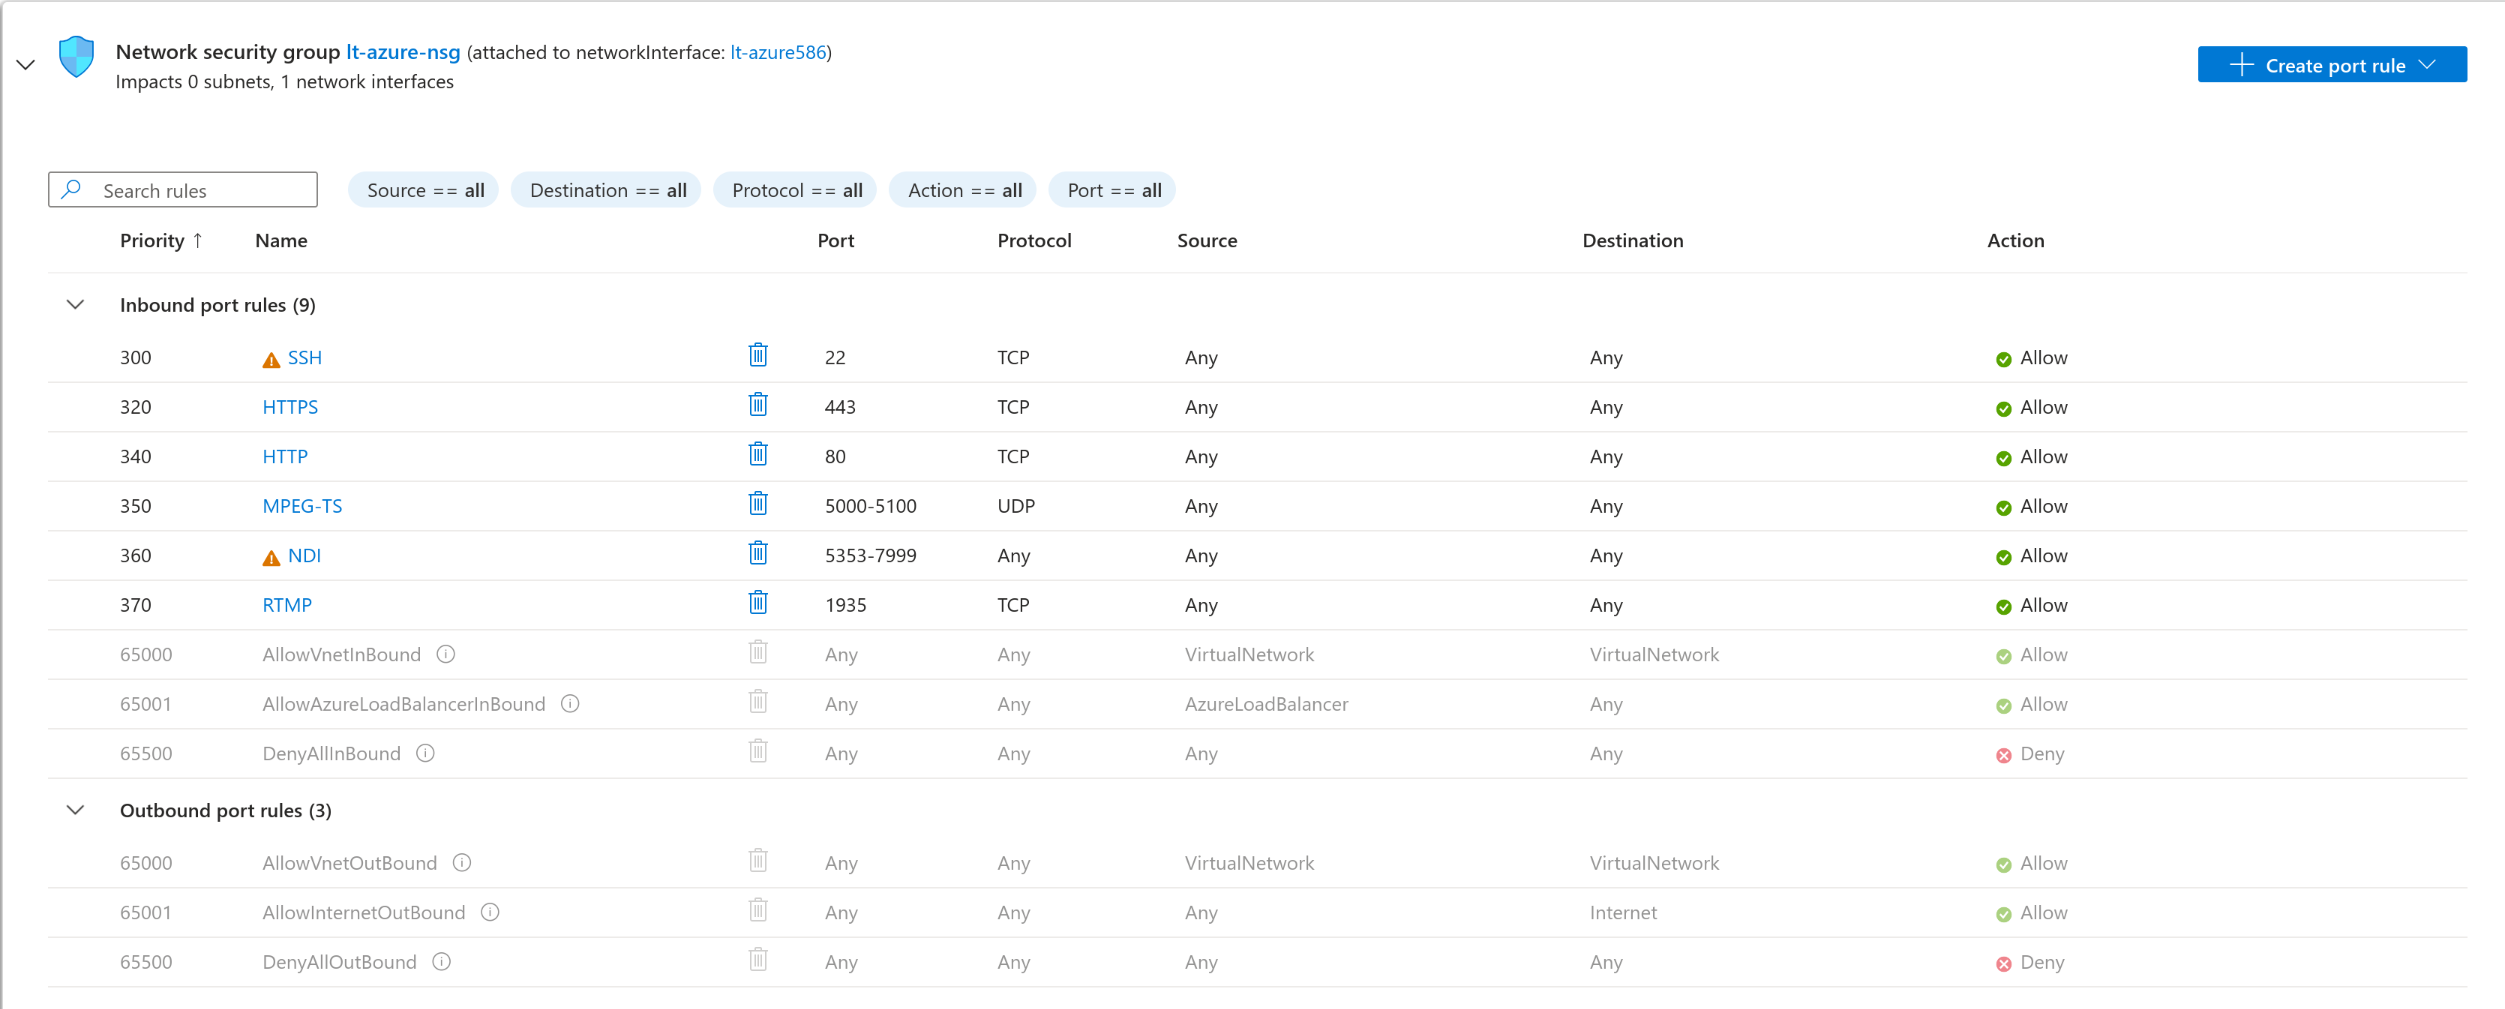
Once the VM is created, open the VM instance overview, navigate to Networking → Network settings, and add the following ports to the inbound security rules under the Network security group.
- SSH (TCP port 22) - for SSH
- HTTP (TCP port 80) - needed for access to web UI and HLS output
- HTTPS (TCP port 443) - needed for secure access to web UI and HLS output
- MPEG-TS over RTP/UDP/SRT (UDP ports) - add custom ports for your MPEG-TS streams
- NDI (TCP&UDP) - needed for NDI to work, the easiest way is to open port range 5353-7999 for both TCP & UDP [NDI docs]
- RTMP input (TCP port 1935) - needed for RTMP server to listen on this port
Your Network security group for the virtual machine should afterwards contain the following rules:
Prepare host OS
SSH to the host OS
Go to the Overview page of your virtual machine instance, click Connect → Connect, and follow the instructions to establish an SSH connection to the host operating system using your downloaded private key.
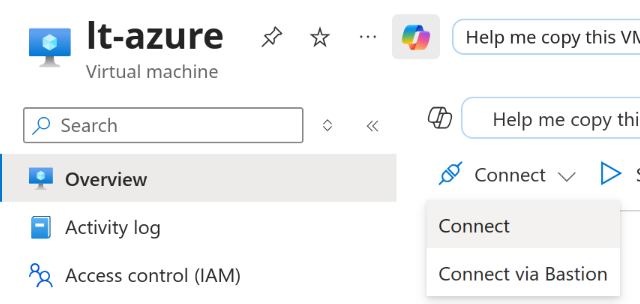
Azure's default user is azureuser, use the following command to SSH to your instance (to the host OS). On Linux and macOS, you'll first need to limit the key file permissions using the chmod command.
chmod 400 path/to/your-private-key.pem
ssh -i path/to/your-private-key.pem azureuser@INSTANCE_IP
Disable nouveau driver
sudo modprobe -r nouveau
Blacklist nouveau at boot
echo "blacklist nouveau" | sudo tee /etc/modprobe.d/blacklist.conf
Upgrade OS
sudo apt upgrade -y
Install NVIDIA GPU driver
sudo apt-get update
sudo apt install nvidia-headless-535 nvidia-utils-535 libnvidia-encode-535
sudo modprobe nvidia
nvidia-smi
Reboot the instance
sudo reboot
Install Docker CE
curl https://get.docker.com | sh && sudo systemctl --now enable docker
sudo groupadd docker
sudo usermod -aG docker $USER
newgrp docker
groups
Install NVIDIA Container Toolkit
curl -fsSL https://nvidia.github.io/libnvidia-container/gpgkey | sudo gpg --dearmor -o /usr/share/keyrings/nvidia-container-toolkit-keyring.gpg \
&& curl -s -L https://nvidia.github.io/libnvidia-container/stable/deb/nvidia-container-toolkit.list | \
sed 's#deb https://#deb [signed-by=/usr/share/keyrings/nvidia-container-toolkit-keyring.gpg] https://#g' | \
sudo tee /etc/apt/sources.list.d/nvidia-container-toolkit.list

sudo apt-get update

export NVIDIA_CONTAINER_TOOLKIT_VERSION=1.17.7-1
sudo apt-get install -y \
nvidia-container-toolkit=${NVIDIA_CONTAINER_TOOLKIT_VERSION} \
nvidia-container-toolkit-base=${NVIDIA_CONTAINER_TOOLKIT_VERSION} \
libnvidia-container-tools=${NVIDIA_CONTAINER_TOOLKIT_VERSION} \
libnvidia-container1=${NVIDIA_CONTAINER_TOOLKIT_VERSION}

sudo nvidia-ctk runtime configure --runtime=docker

sudo systemctl restart docker
Install Docker Compose
sudo curl -L https://github.com/docker/compose/releases/latest/download/docker-compose-$(uname -s)-$(uname -m) -o /usr/local/bin/docker-compose
sudo chmod +x /usr/local/bin/docker-compose
docker-compose version
Increase max UDP kernel buffer size
SYSCTL_CONF="/etc/sysctl.d/10-udp-buffer-size.conf"
sudo sh -c "echo '#kernel send a receive windows buffer sizes' > $SYSCTL_CONF"
sudo sh -c "echo 'net.core.rmem_max=262144000' >> $SYSCTL_CONF"
sudo sh -c "echo 'net.core.wmem_max=262144000' >> $SYSCTL_CONF"
sudo sh -c "echo 'net.core.rmem_default=262144000' >> $SYSCTL_CONF"
sudo sh -c "echo 'net.core.wmem_default=262144000' >> $SYSCTL_CONF"
sudo sh -c "echo '' >> $SYSCTL_CONF"
sudo sysctl -p $SYSCTL_CONF
Increase txqueuelen for network interfaces
sudo bash -c 'cat > /etc/udev/rules.d/80-txqueuelen.rules' << EOF
SUBSYSTEM=="net", ACTION=="add|change", KERNEL=="e*", ATTR{tx_queue_len}="10000"
EOF

sudo udevadm control --reload-rules && sudo udevadm trigger
Disable mDNS on the host
The mDNS service mustn't be active in the host OS for NDI discovery to work. If present, this command removes it from the host OS:
sudo dpkg -l | grep "avahi-daemon"
sudo apt remove --purge avahi-daemon -y
Install systemd-coredump
It's needed for the creation of diagnostic packages when something goes wrong.
sudo apt install systemd-coredump
Configure cgroup settings
Edit the Configuration File /etc/docker/daemon.json and add or modify the cgroup-related settings
{
  "default-cgroupns-mode": "host"
}
If your daemon.json file already contains the runtimes configuration for NVIDIA, you can simply add additional configuration for cgroup settings without overwriting the existing content:
{
    "runtimes": {
        "nvidia": {
            "args": [],
            "path": "nvidia-container-runtime"
        }
    },
    "default-cgroupns-mode": "host"
}
Save the file and restart the Docker daemon to apply the changes:
sudo systemctl restart docker
Your instance is fully prepared to run Live Transcoder in Docker.